
The smart devices you use in your home are talking to the internet far more often than you realise. That includes your TV, phone, smart speaker, laptop, games console and tablet.
Knowing this, many folks would like the option to monitor which devices are talking to whom, and curb the "conversations" they're not comfortable with. That's exactly what Pi-hole is designed to accomplish.
This post describes the full setup of a Pi-hole on a Raspberry Pi, step by step, including the router settings most other guides skip. If you make it to the end, you'll also find a quick rundown of the dashboard and other tips and tricks.
What Pi-hole does
Before a device connects to anything, it looks up the domain name. That lookup is DNS, the Domain Name System (opens in a new window), and it works like a phone book. Your phone might ask "where is youtube.com?" A DNS server would reply with an address, and your phone connects.
Your router or internet service provider normally relays the answers to those questions. Pi-hole (opens in a new window) takes over that job for your home network. When a device asks for a domain on its blocklist, which could be a known ad or tracking server, Pi-hole answers with an address that goes nowhere.
A Pi-hole running on a Raspberry Pi doesn't become your gateway, the device that connects your home to the internet. That responsibility remains with your router. The Pi is only there to answer lookups, and everything else flows through your router exactly as before.
And because this happens at the network level, it covers every device connected to your Wi-Fi. That includes the ones that can't run an ad blocker of their own, like smart TVs, games consoles and speakers.
Why it's worth it
You see what your devices do. Pi-hole logs every lookup, so you can see which device contacted which domain, and when.
It blocks telemetry as well as ads. Telemetry is the usage data devices and apps send back to their makers. Expect a large share of what gets blocked to fall into this category. My TV has stopped nagging me with messages about how many hours I've been watching.
It covers your whole home. Browser extensions only work inside a browser. Pi-hole reaches the smart TV in the corner as well.
But there are limits:
Pi-hole can only allow or block a whole domain, so it can't block ads served from the same servers as the content (like YouTube, for example).
The same goes for sponsored posts served from a site's own domain.
Some devices use their own hard-coded DNS servers and can skip Pi-hole entirely.
Devices on a VPN send their lookups through the VPN, beyond the Pi-hole's scrutiny.
A browser extension like uBlock Origin (opens in a new window) covers some of these gaps, since it can see inside the page. Based on my testing, the two work well together.
The best tool for the job: Raspberry Pi 3B+
Pi-hole is tiny. The official requirements (opens in a new window) are 512MB of RAM and 2GB of free storage, with 4GB recommended. It only answers lookups. Your video streams and downloads never pass through it.
For this reason, the perfect pairing is a Raspberry Pi 3B+. This third-generation single-board computer was first released on 14 March 2018, has 1GB of RAM, and stays cool without a fan. The product brief (opens in a new window) says it'll stay in production until at least January 2030.
The Pi 3B+ is mature, cheap, well-understood hardware being put to a new use. Gunpei Yokoi, the famous engineer behind the Game & Watch and Game Boy at Nintendo (opens in a new window), called this approach "lateral thinking with withered technology". A Pi 4 or 5 would work too, but it's far more processing power than the job requires.
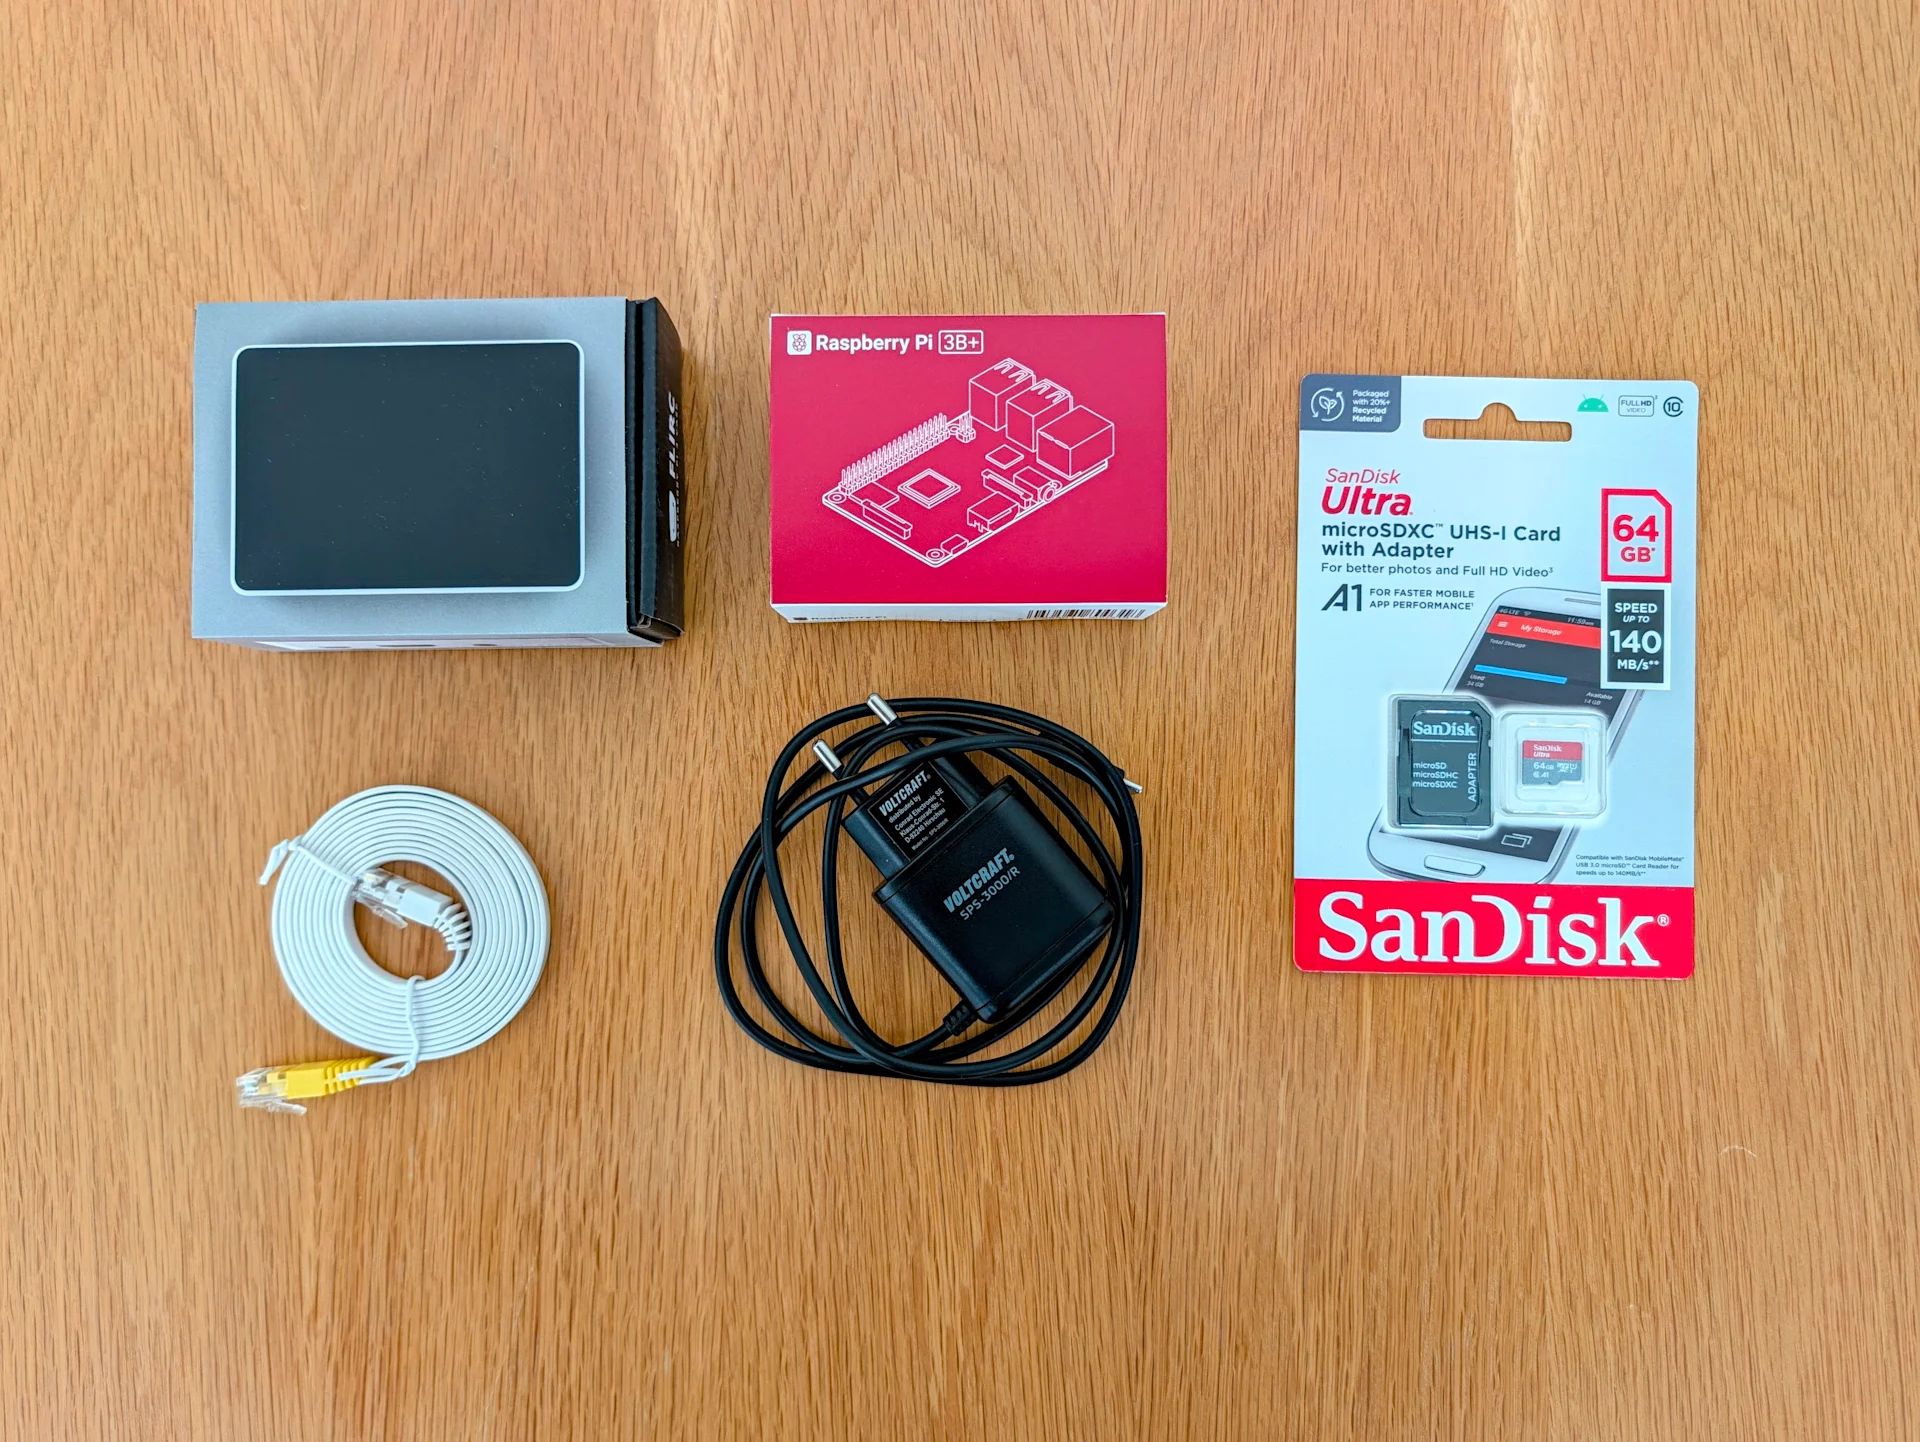
What I used
Raspberry Pi 3B+ and a case with passive cooling.
A 64GB microSD card, though anything from 8GB up is plenty. I didn't have one handy for my initial setup, but consider a 'High Endurance' card optimised for devices that write data around the clock.
A 5V, 3A micro-USB power supply. The product brief asks for at least 5V, 2.5A. Cheap phone chargers often fall short, and an underpowered Pi misbehaves.
An Ethernet cable. Wi-Fi works, but a cable is more reliable for something every device depends on.
A computer to set it up from. I used a Mac.
Set up the Pi
Flash the card
Download Raspberry Pi Imager (opens in a new window) and install it.
Put the microSD card into your computer.
In Imager, choose Raspberry Pi 3 as the device.
For the operating system, go to Raspberry Pi OS (other) and choose Raspberry Pi OS Lite (64-bit). Lite has no desktop, which a Pi with no screen doesn't need.
Choose your SD card as the storage.
When Imager offers to customise settings, fill these in.
Hostname
piholeA username and password you'll remember
Your time zone
Enable SSH with password login. SSH lets you control the Pi from your computer's terminal, so you never need to plug in a screen.
Skip Wi-Fi if you're using a cable
Write the card.
Imager's screens change a little between versions, so your wording may differ.
Connect to the Pi
Put the card in the Pi and the Pi in its case.
Connect the Pi to your router with the Ethernet cable, then plug in the power. Give it about two minutes to start.
On your computer, open a terminal. On a Mac that's the Terminal app, on Windows it's PowerShell. Type the command below, replacing
yourusernamewith the username you chose.
ssh yourusername@pihole.localIf asked whether you trust the connection, type yes, then enter your password. Nothing appears on screen as you type it, which is normal. You're now typing commands on the Pi itself.
Update everything
Next, type the following command, and enter your password when prompted.
sudo apt update && sudo apt full-upgrade -yOn a 3B+ this can take five to ten minutes.
Find the Pi's address
Run hostname -I. The first number is the Pi's address on your network. Mine was 192.168.178.xx. Write yours down.
Give the Pi a fixed address
Every device on your network will send its lookups to the Pi, so its address must never change. The Pi-hole docs (opens in a new window) say a reservation on your router is fine for this. A reservation tells the router to always give the Pi the same address.
Most routers have this setting in their list of connected devices. On a Fritz!Box it works like this.
Go to
fritz.boxin your browser and log in.Go to Home Network > Network.
Find
piholeand click the pencil icon.Tick Assign permanent IPv4 address, then click Apply.
If you can't find a Fritz!Box setting, click Standard in the bottom left to switch to the advanced view.
Install Pi-hole
I tested these steps on Pi-hole v6.5 (Web v6.6.1, FTL v6.8). Menu names and settings move around between versions, so if yours look different, check the linked docs.
Back in the terminal, run the official installer:
curl -sSL https://install.pi-hole.net | bashThis downloads Pi-hole's installation script and runs it. If you'd rather read a script before running it, the installation docs (opens in a new window) list other methods.
The installer opens a blue text menu. Use the arrow keys to move, the space bar to select and Enter to confirm. These were my choices.
Static IP warning. Continue. You've already reserved the address.
Upstream DNS provider. This is the service Pi-hole asks when a domain isn't blocked and isn't in its memory. I chose Quad9 (filtered, DNSSEC). Quad9 (opens in a new window) is a Swiss non-profit resolver focused on privacy, and the filtered version also refuses known malicious domains.
Blocklist. Yes to the default list.
Query logging. On. The log is where the interesting information lives.
Privacy mode. Show everything, which makes the log most useful. It records all activity on your network, though, so notify everyone in your household as a courtesy.
One caveat on Quad9. Lookups still travel to it unencrypted, so your internet provider can see which sites your devices look up. Encrypting them takes more setup, which I'll cover in a follow-up post.
The last screen shows your Pi's address and a password for the web interface.
Change the password
Run pihole setpassword and type a new password when asked. If you get a permission error, run it again with sudo in front.
Give your account access
Out of the box, your user account can't read Pi-hole's settings files, so commands like pihole status show permission warnings. The post-install docs (opens in a new window) recommend adding your account to the pihole group.
sudo usermod -aG pihole $USERType exit, then connect again with ssh. The change only applies to new sessions.
Open the dashboard
In your browser, go to your Pi's address followed by /admin. For me that was http://192.168.178.xx/admin.
The page will suggest upgrading to HTTPS. Pi-hole creates its own security certificate, but because no recognised authority vouches for it, browsers show a warning. The connection is still encrypted. The Pi-hole TLS docs (opens in a new window) explain how to make your browser trust it. On a home network, plain HTTP is a reasonable choice for now.
Add Quad9's IPv6 addresses
Most home networks now run two kinds of addresses side by side, the older IPv4 and the newer IPv6. The installer only sets up Quad9's IPv4 addresses.
If your connection has IPv6, go to Settings > DNS, tick the two IPv6 boxes in the Quad9 row you chose, and click Save & Apply. That gives Pi-hole a second route to Quad9.
Pi-hole is now running. Congratulations! But nothing is using it yet.
Point your network at the Pi-hole
Your router tells every device which DNS server to use when it joins the network. You need to change that answer to the Pi-hole. Three problems come up on almost any router, so each gets its own section below, with the steps on my Fritz!Box as the example.
Pick a quiet moment for this part. A wrong setting can take every device in your home offline until you fix it, so don't start ten minutes before someone needs a video call. If it does go wrong, the two-minute undo near the end of this guide gets you back.
Pi-hole has setup guides for several routers, including Fritz!Box (opens in a new window), ASUS, TP-Link and Ubiquiti. If yours isn't covered, their general guide (opens in a new window) explains the options.
Problem one, telling devices to use the Pi-hole
Look in your router's network or DHCP settings (the part of the router that hands out addresses) for a field called something like Local DNS server, and set it to your Pi's address. On a Fritz!Box it's under Home Network > Network > Network Settings, in the advanced settings on the IPv4 tab.
Many routers have a second DNS setting for the router's own internet connection. Leave that one pointing anywhere except the Pi-hole. The Pi-hole docs warn that pointing both at each other creates a DNS loop, with the router and the Pi-hole endlessly passing requests back and forth.
Devices only pick up the change when they reconnect. Turn your computer's Wi-Fi off and on, then run this in a terminal on the computer, not the Pi.
nslookup doubleclick.netdoubleclick.net is one of Google's ad domains. You want your Pi's address as the server and 0.0.0.0 as the answer, which means Pi-hole caught it. If the output looks something like this, then you're golden.
Server:		192.168.178.xx
Address:	192.168.178.xx#xx

Name:	doubleclick.net
Address: 0.0.0.0
Problem two, local names stop working
Your router's own name, and the names of devices on your network, stop resolving. On a Fritz!Box, fritz.box stops loading. Those names only exist inside your router, and Pi-hole is now forwarding everything to Quad9, which has never heard of them. You can still reach the router by its address, http://192.168.178.1 on a Fritz!Box.
The fix is conditional forwarding, which tells Pi-hole to send questions about your home network back to the router. It also makes the dashboard show device names instead of bare addresses.
In the Pi-hole dashboard, go to Settings > DNS. If you don't see a Conditional forwarding box, switch the page from Basic to Expert at the top right. The box takes one line in the format below, followed by the line for a Fritz!Box on its default settings.
# The format
true,your network range,your router's address,your local domain

# A Fritz!Box on its default settings
true,192.168.178.0/24,192.168.178.1,fritz.box
In plain words, "switch this on, for every address from 192.168.178.0 to 192.168.178.255, ask the router at 192.168.178.1, for anything ending in fritz.box". The /24 is shorthand for that range. Click Save & Apply, then check your router's name loads again.
Problem three, the IPv6 gap
Routers hand out a DNS server for IPv4 and IPv6 separately. Change only IPv4, and devices can still send some lookups straight to the router over IPv6, past the Pi-hole. To check, run this on a Mac.
scutil --dns | grep nameserverOn Windows, ipconfig /all shows the same under DNS Servers. Mine listed the Pi-hole's IPv4 address, then two IPv6 addresses belonging to the Fritz!Box.
To close the gap, find the Pi's own IPv6 address. On the Pi, run this.
ip -6 address | grep "inet6 fd"Use the line starting with fd. These are unique local addresses, private IPv6 addresses that only work inside your home, much like 192.168. addresses for IPv4. Avoid the Pi's public IPv6 address, the one hostname -I also shows. Your internet provider assigns it, and it can change. If you see more than one fd line, ignore any marked temporary.
Then find your router's IPv6 DNS setting and enter that address. On a Fritz!Box, it's in the advanced network settings under the IPv6 tab.
Check Always assign unique local addresses (ULA) is ticked.
Under DNSv6 Server in the Home Network, set Local DNSv6 server to the Pi's
fdaddress.Tick Also announce DNSv6 server via router advertisement (RFC 5006). The Pi-hole docs recommend it, and Macs pick up their IPv6 DNS server this way.
Click Apply, then reload the page and check the address is still there.
That last step matters. My first attempt didn't save, and the field kept the Fritz!Box's own address. I only noticed because the check still failed.
My Fritz!Box also labelled the Pi's address as temporary, which worried me. Linux didn't, so I restarted the Pi with sudo reboot, reconnected, and ran the ip -6 address command again. Same address. If yours changes after a restart, don't use it, and ask in the Pi-hole forums (opens in a new window) first.
Final check
Reconnect your computer's Wi-Fi and run the DNS check again. You should see only the Pi-hole's two addresses, one IPv4 and one IPv6.
Your computer is only one device. Turn your phone's Wi-Fi off and on, browse for a minute, then open the Query Log in the dashboard and check its lookups appear. A device that never shows up is going around the Pi-hole, usually by still asking the router. On a phone, also check it isn't set to use its own private DNS provider.
To confirm the Pi-hole answers over IPv6 as well, ask it directly with nslookup example.com your-pi-fd-address, replacing the last part with your Pi's fd address. You should get an address back.
On the Pi, run pihole status. It should show Pi-hole listening on port 53, the standard channel for DNS, over IPv4 and IPv6, with blocking enabled.
Other devices switch over as they reconnect, or when their lease with the router renews. On my Fritz!Box that takes ten days, so toggling Wi-Fi on phones and restarting the TV speeds things up.
Reading the dashboard
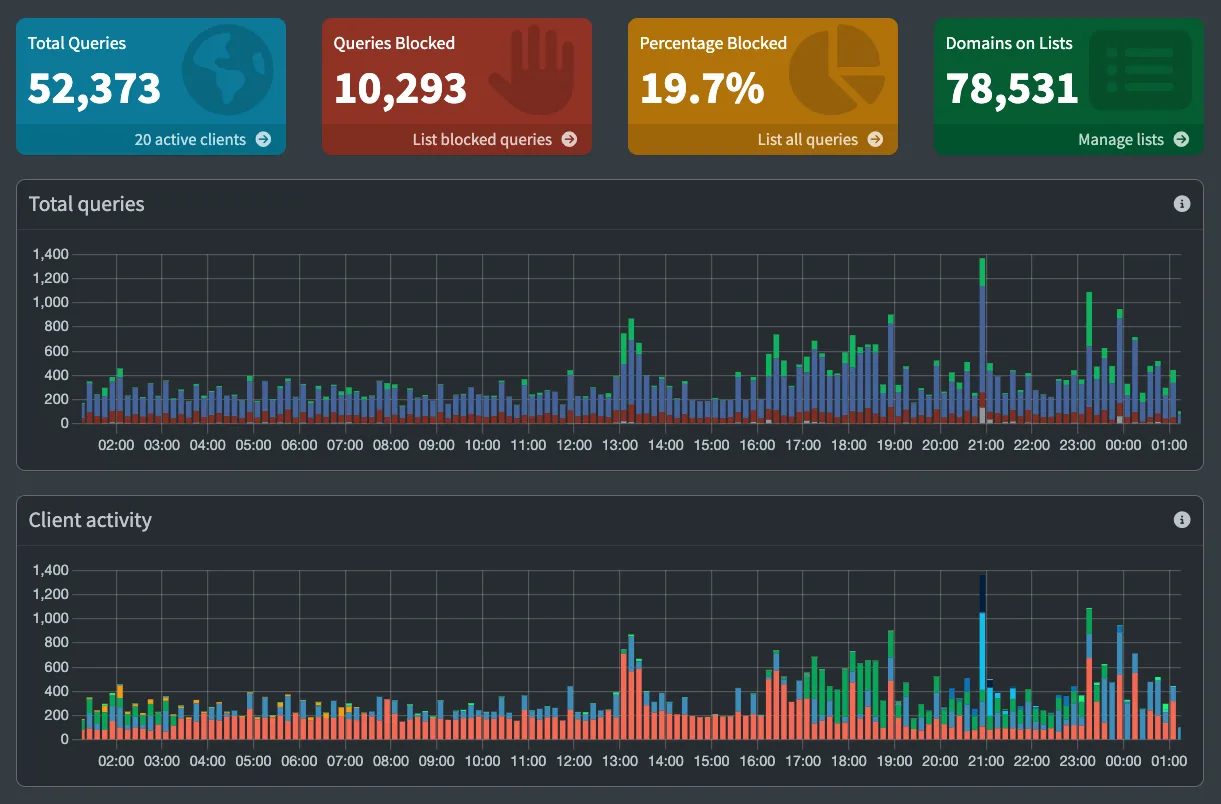
Give it a few days before drawing conclusions. The first day mostly shows devices reconnecting.
The headline numbers at the top show total lookups, how many were blocked, the percentage, and how many domains are on your blocklists.
The Query Log lists every lookup. Filter it by one device to see exactly what that device does, including overnight, when nobody is using it. Blocked lookups appear in red. The biggest surprise for me was the sheer volume of it, traffic I'd never have known was there.
Top Blocked Domains is where the chattiest devices show themselves. Expect much of it to be telemetry. A domain blocked hundreds of times a day is usually one device retrying every minute or so, because each refusal prompts another attempt. My smart speaker does exactly this, phoning home every minute in a state of panic.
Some blocks are Pi-hole's own defaults, and they appear on almost everyone's dashboard.
mask.icloud.comis Apple devices trying to check for iCloud Private Relay, which routes browsing through Apple's servers and would take those devices out of Pi-hole's reach. Pi-hole blocks it by default, following Apple's guidance for networks (opens in a new window). Your iPhone may show a notice that Private Relay is off for your network._dns.resolver.arpais devices trying to find and switch to a different encrypted DNS server. Another Pi-hole default, for the same reason.
Because of defaults like these, the blocked percentage overstates how much tracking is being stopped. Treat it as a rough guide.
Upstream servers shows who answered each lookup. The biggest slice is usually cache, meaning Pi-hole looked that domain up recently and answered from memory. Cached answers are faster, and your upstream provider never sees them.
Device names appear once conditional forwarding is on. A device using only IPv6 may still show as a long address beginning fd, which is harmless.
Diagnosis warnings sometimes appear as a badge next to Tools > Pi-hole diagnosis. A one-off warning is usually noise. The Pi-hole docs have a list of known warnings (opens in a new window) explaining each, so check there before changing anything.
Living with it
Allowlisting is a choice
Pi-hole blocks what's on its lists, and you decide the exceptions. If you're happy for a company to receive data from an app or device, you can allow its domain.
In the dashboard, go to Domains and add it as an allowed exact domain, or run pihole allow the.domain.you.want on the Pi.
Also note that switching telemetry on in the device's own settings achieves nothing while Pi-hole blocks its domain. The request is still refused.
When something breaks
Nothing has broken for me so far. If something does, here's how to check whether Pi-hole is to blame.
In the dashboard sidebar, click Disable Blocking and choose five minutes.
Try again. If the problem persists, Pi-hole isn't the cause.
If it works, turn blocking back on, open the Query Log, reproduce the problem, and look for red blocked entries from that device at that moment. Allow that one domain.
Resist extra blocklists
Pi-hole's default list does most of the work. If you want a stronger one, the two most recommended are OISD Big (opens in a new window) and HaGeZi (opens in a new window). Pick one and use it instead of the default (not as well as). Bigger lists block more, but they also break more, and HaGeZi already includes the default list and OISD. Firebog (opens in a new window) is a curated directory if you want to browse.
Smart TVs are the one case for adding a list. HaGeZi publishes small lists for specific TV platforms that block tracking without breaking features. Add the one for your TV under Lists in the dashboard, run Tools > Update Gravity, then restart the TV.
If it breaks, the two-minute undo
If the Pi dies, every device in your home loses DNS, which looks exactly like the internet being down. Keep these steps where everyone in your household can find them.
Open your router's settings by its address. On a Fritz!Box that's
http://192.168.178.1, sincefritz.boxwon't work while the Pi is down.Set the Local DNS server back to the router's own address.
Set the IPv6 DNS server back to the router's own address. On a Fritz!Box it's shown on the same IPv6 page as Unique local address of your FRITZ!Box.
Reconnect your devices. They won't pick up the change until they do.
Tips for smooth running
Back up your settings
Pi-hole has a built-in backup tool called Teleporter. In the dashboard, go to Settings > Teleporter and click Export. You get a zip file containing your settings, blocklists, allowlist and conditional forwarding. Keep it on your computer, away from the Pi.
After a rebuild, install Pi-hole fresh, import the file on the same page, and your setup comes back. The file includes your dashboard password in scrambled form, so keep it private. Export again after any change.
Keep the Pi updated
It's an always-on computer on your network, so it should patch itself. Run these, choosing Yes when asked.
sudo apt install unattended-upgrades -y
sudo dpkg-reconfigure -plow unattended-upgrades
Pi-hole updates separately. Run pihole -up every month or so. Its blocklists refresh automatically once a week, according to the pihole command docs (opens in a new window).
Look after your SD card
SD cards wear out with repeated writing, and a Pi-hole runs around the clock, saving its query history every minute by default. When a card fails, it tends to fail suddenly.
To save history less often, run these on the Pi.
sudo pihole-FTL --config database.DBinterval 900
sudo systemctl restart pihole-FTL
The number is in seconds, so 900 means every 15 minutes. A power cut costs you up to 15 minutes of dashboard history. Blocking carries on as normal.
Keep a backup and a spare card, if you like: With a Teleporter backup, a dead card means a reflash and an import instead of a rebuild from scratch.
Or skip the SD card altogether: According to Raspberry Pi's documentation (opens in a new window), the 3B+ can start from a USB drive with no SD card inserted. Not every USB device works, so test yours first.
Wrapping up
That's everything you need to get up and running with Pi-hole on a Raspberry Pi. It's a cool project and well worth an afternoon of your time, especially if there's a spare Pi gathering dust in a drawer. At a later date, I'll share a follow-up guide with further tweaks and optimisations, including encrypting your lookups.
Further reading
1950s mid-century cartoon illustration of a cheerful bakelite rotary telephone with its coiled cord snipped at one end, thick confident outlines, limited palette of mustard, teal and cream, halftone dot texture, retro instructional film style, 16:9.written by

Trippy Robot
The games desk, indie and retro division. Trippy Robot hunts down the curios which are small, strange or half-remembered, then reports back on where to find them. Runs hot, sees patterns that may not be there, too scrambled to gatekeep.